
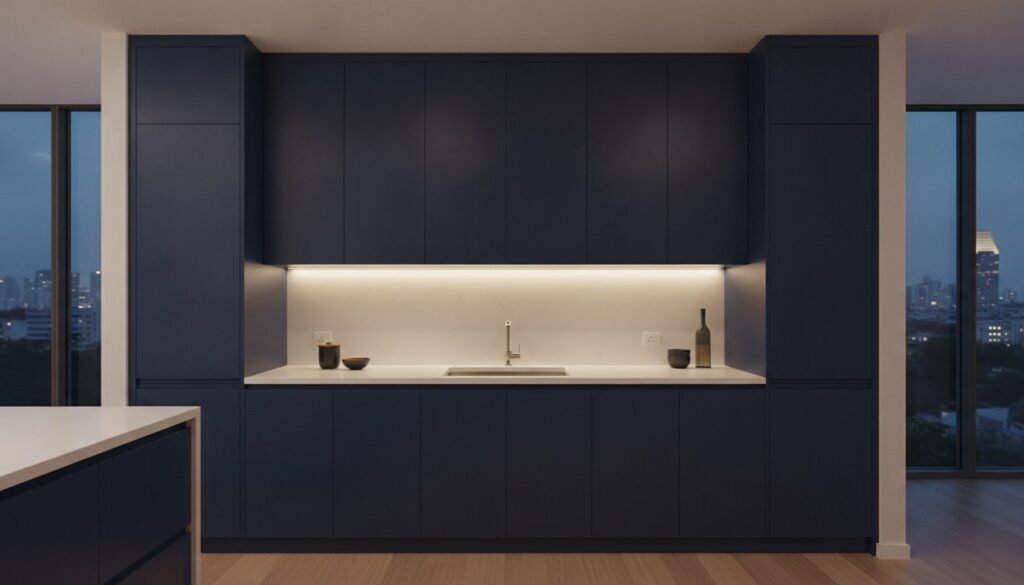
A high-end kitchen isn’t defined by the price of the quartz countertop, but by the lighting you can’t see. It’s frustrating when a beautiful set of custom cabinets is ruined by visible wires or LED strips that start peeling off within months. You likely want that seamless, high-end glow without the technical headaches or uneven light spotting on your surfaces. If you’re wondering How To Install LED Lights In Your Custom Made Cabinets And Carpentry? the secret isn’t in the adhesive tape; it’s in the carpentry fabrication phase itself.
We agree that professional lighting should be felt, not seen. This guide will teach you the technical secrets of professional LED integration to elevate your custom carpentry with durable, hidden lighting. You’ll learn how to route cables during the initial carpentry build, where to properly hide drivers and transformers, and how to select 3-tick NEA rated LEDs that meet Singapore’s 2026 energy standards. We’re moving beyond basic stick-on lights to create a permanent, integrated solution for your home.
Key Takeaways
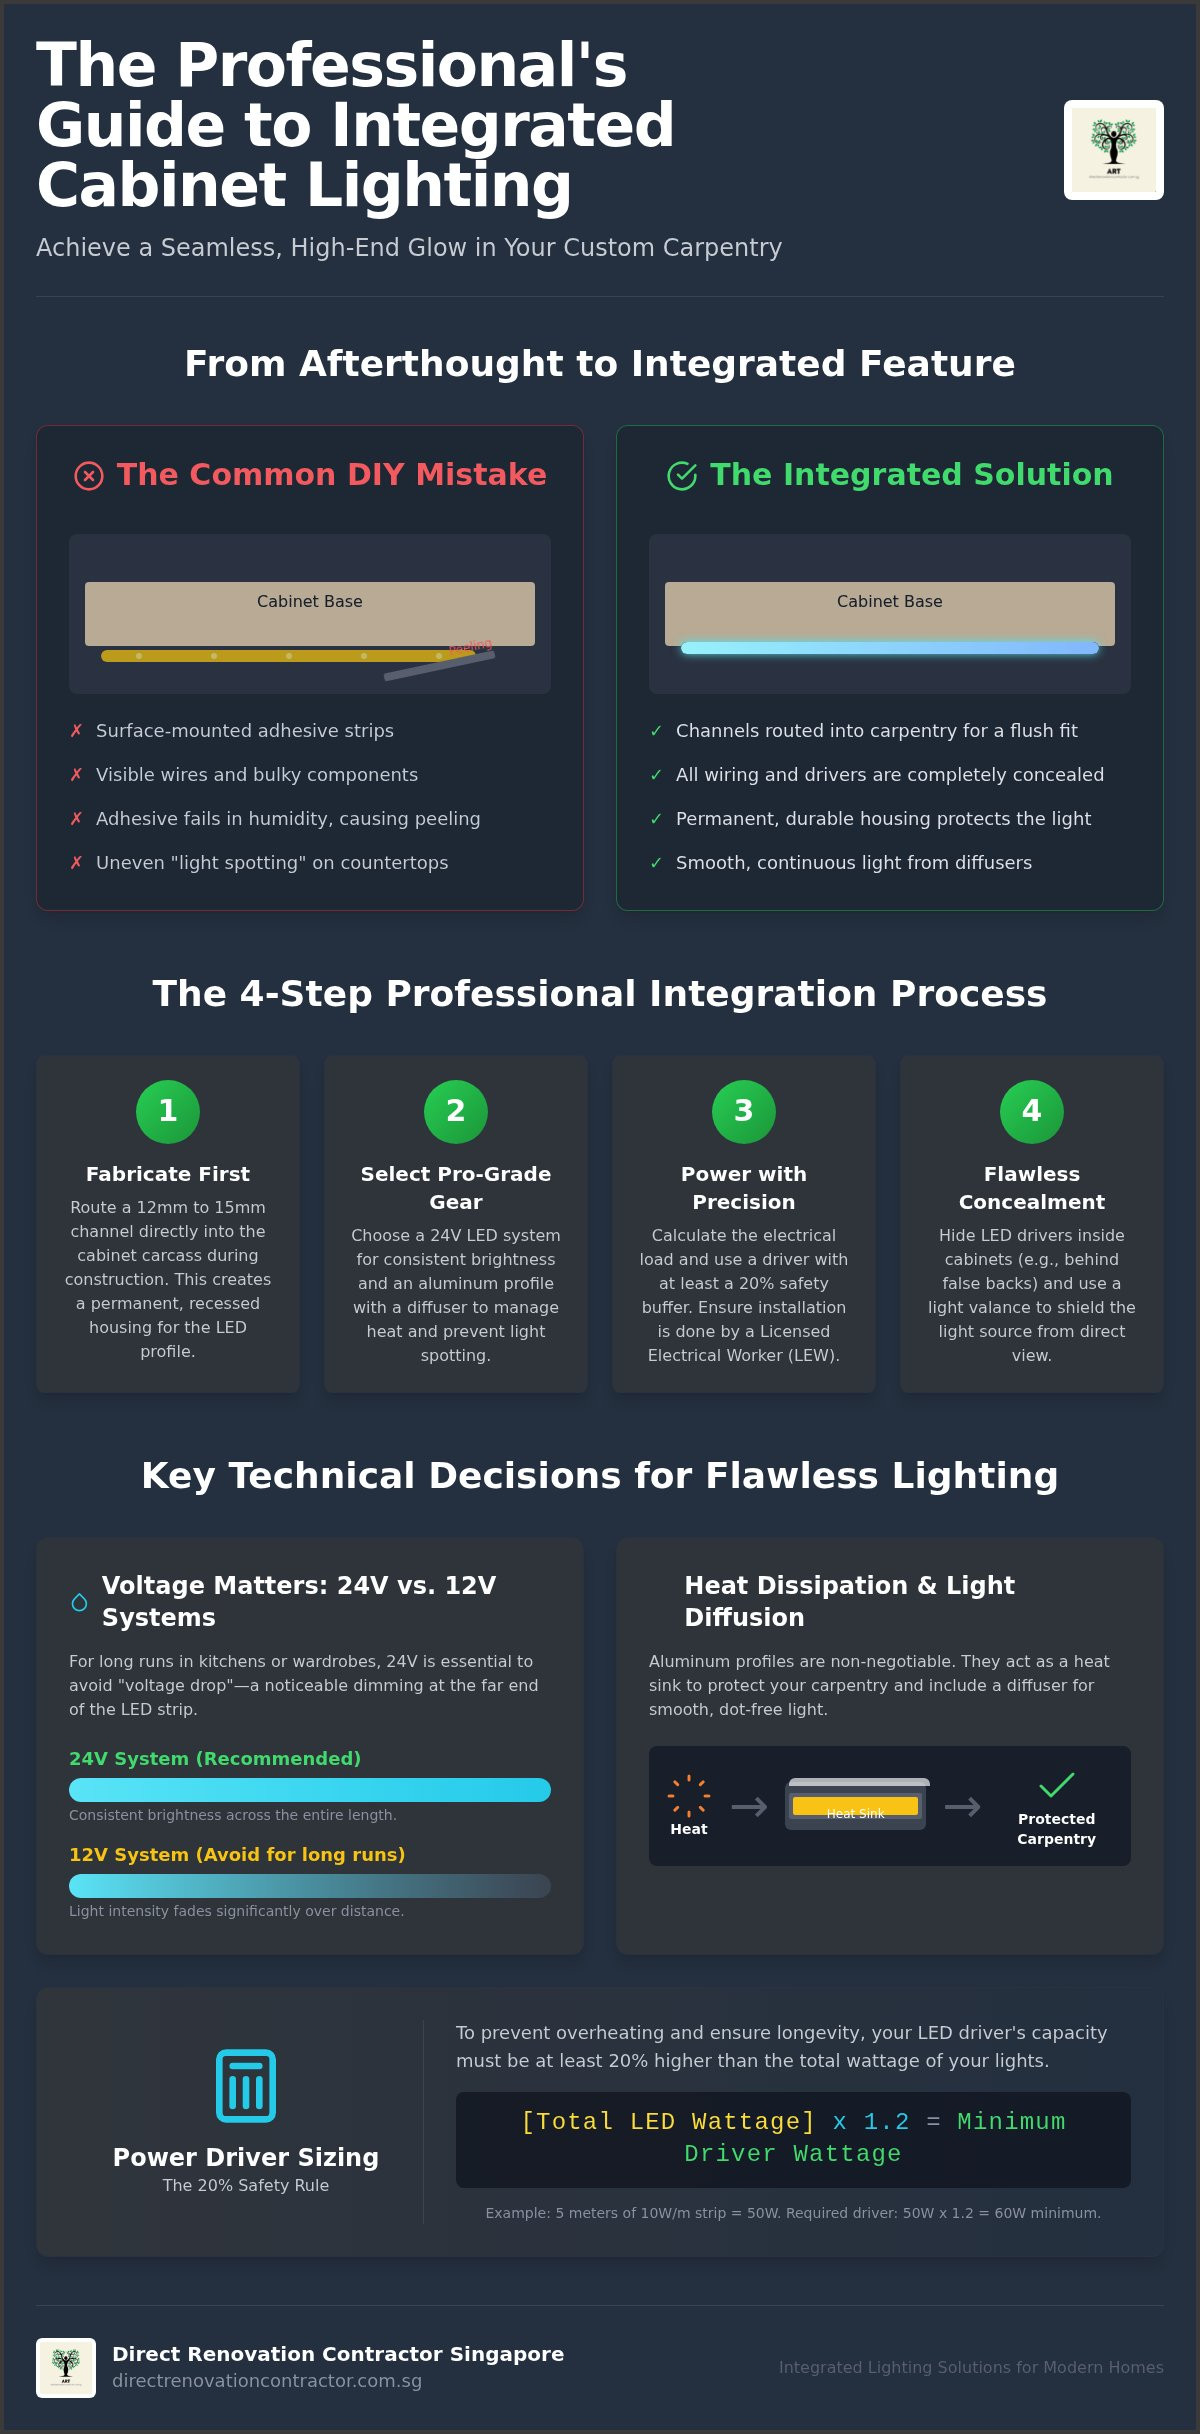
- Learn How To Install LED Lights In Your Custom Made Cabinets And Carpentry? by routing 12mm to 15mm channels directly into the carcass during the carpentry fabrication stage for a flush, professional finish.
- Opt for 24V LED systems over standard 12V strips to maintain consistent brightness across long runs in wardrobes and kitchen counters without experiencing voltage drop.
- Prevent laminate peeling and “light spotting” on glossy surfaces by using aluminum profiles that manage heat dissipation and provide smooth, continuous light diffusion.
- Coordinate the placement of LED drivers and cable routing early in the project to ensure all transformers are accessible yet completely hidden from view.
- Understand why integrated carpentry solutions outlast DIY adhesive kits by providing a permanent, recessed housing that protects the lighting components from moisture and wear.
Why Integrated Lighting is Essential for Modern Singapore Carpentry
Many homeowners treat lighting as a finishing touch, often buying adhesive strips to stick under cabinets after the renovation is done. This approach usually leads to peeling tape, exposed wires, and uneven illumination. If you want to know How To Install LED Lights In Your Custom Made Cabinets And Carpentry? with a professional finish, you must understand the difference between an add-on and an integrated solution. True integration involves routing a dedicated channel into the timber carcass during the fabrication phase. This allows the light to sit flush with the surface, providing a clean look that surface-mounted kits can’t replicate. Modern LED strip light technology is designed to be slim, but it still requires a stable, recessed housing to manage heat and ensure the strip stays in place for years.
The Aesthetic vs. Functional Argument
In a typical Singapore HDB or condo, lighting serves two practical purposes: utility and mood. Task lighting is vital in the kitchen. Without it, your upper cabinets cast shadows over the countertop, making food preparation difficult and even unsafe. In deep wardrobes or pantry carcasses, integrated LEDs allow you to see into the furthest corners without straining. We also focus on the Color Rendering Index (CRI). High-quality LEDs ensure that the specific wood grain or laminate finish you selected looks accurate under artificial light. When you work with a carpenter Singapore expert, we plan these angles early to avoid “hot spots” or glare on glossy surfaces, which is a common complaint with poorly placed DIY kits.
Planning the “Invisible” Look
A professional home renovation is defined by what you don’t see. When we address How To Install LED Lights In Your Custom Made Cabinets And Carpentry?, the goal is total wire concealment. This is achieved by using a carpentry “light valance” or a recessed lip that shields the LED profile from your direct line of sight. We coordinate the electrical load with the wiring team to ensure that power points and transformers are tucked away inside cabinets, often behind false backs or in top-shelf corners. This prevents bulky drivers from ruining your backsplash aesthetics. By embedding the lights directly into the carpentry carcass, we eliminate the risk of adhesive failure caused by the high humidity levels found in local kitchens. It’s a technical, process-driven approach that ensures your lighting is as durable as the cabinets themselves.
Technical Requirements: Drivers, Strips, and Electrical Load
The LED driver is the brain of your lighting system. It converts the standard 230V AC power from your home’s mains into the low-voltage DC power required by the LED strips. When you’re figuring out How To Install LED Lights In Your Custom Made Cabinets And Carpentry?, selecting the right driver is your first priority. We recommend 24V systems over 12V for almost all custom carpentry projects in Singapore. 24V systems suffer significantly less from voltage drop, which is the loss of brightness that occurs over longer runs of lighting. If you’re lighting a large L-shaped kitchen or a full-height wardrobe, 24V ensures the light at the end of the strip is just as bright as the light at the start.
Calculating the electrical load is a matter of simple math that keeps your home safe. You must add up the total wattage of your LED strips and add a 20% safety buffer. For example, if you have 5 meters of strip light rated at 10W per meter, your total load is 50W. You should use at least a 60W driver to prevent overheating. In Singapore, any addition of new lighting points or concealed wiring must be performed by a Licensed Electrical Worker (LEW) to comply with HDB and EMA safety regulations. This technical precision is why our in-house electrical team works directly with our carpenters to ensure every transformer is sized correctly for the specific cabinet layout.
Choosing the Right LED Strips
Not all LED strips are equal. For kitchen task lighting, you need higher wattage per meter to ensure your food prep area is bright. However, higher wattage generates more heat, which can damage cabinet laminates if not managed. We often suggest COB (Chip on Board) strips for glossy countertops because they provide a “dot-less” continuous bar of light without the visible spots seen in older SMD strips. If you’re installing lights near a kitchen sink, ensure the strips have an IP65 rating for moisture protection. For dry areas like wardrobes or display shelves, a standard IP20 rating is sufficient and helps with heat dissipation.
Driver Placement and Accessibility
Hiding the driver is essential for a clean look, but it shouldn’t be buried forever. Drivers are electronic components that can eventually fail. We typically hide them in the top compartment of a cabinet or inside a false ceiling. The driver needs adequate ventilation to prevent it from burning out prematurely. Never seal a driver behind a permanent panel that requires hacking to access. Instead, we use magnetized panels or discreet service hatches. This pragmatic approach ensures that if a transformer needs replacement in five years, the job takes ten minutes rather than a full day of carpentry repairs.
Step-by-Step Installation: Routing Channels in Custom Cabinets
Professional integration starts at the factory, not at the job site. If you’re looking for How To Install LED Lights In Your Custom Made Cabinets And Carpentry? with a factory-finish look, the work begins before the cabinets are even assembled. We mark the exact position of the light channels on the raw plywood panels during the fabrication phase. This ensures that every groove is perfectly straight and aligned across multiple cabinet carcasses. Measuring twice is vital here. Once the channel is cut into the laminate and wood, it cannot be undone without replacing the entire panel.
When executing the steps for How To Install LED Lights In Your Custom Made Cabinets And Carpentry?, we typically aim for a 12mm to 15mm wide channel, depending on the specific aluminum profile selected. The depth of the cut is equally critical. For a standard 15mm or 18mm cabinet carcass, we route a groove roughly 6mm to 8mm deep. This provides enough space for the profile to sit flush without compromising the structural integrity of the cabinetry. After the main channels are cut, we drill internal wire paths. These are small 8mm to 10mm holes tucked into the corners of the carcass that allow cables to travel from the LED strip to the hidden driver location without being seen from the outside.
The Routing Process
We use a high-speed router bit to create a crisp, recessed path. Unlike hand-cutting, a router ensures the edges of the laminate don’t chip or fray. When managing corner turns, we avoid using bulky plastic clip connectors. These clips are often too wide for a standard 12mm channel and can create unsightly bumps under the diffuser. Instead, we prefer to solder the joints. Soldering creates a flat, permanent connection that sits easily within the routed groove, ensuring the light remains continuous around 90-degree bends in L-shaped kitchens or wardrobes.
Aluminum Profiles and Diffusers
Aluminum is a non-negotiable component of any professional installation. Since wood is a natural insulator, it traps heat. Without an aluminum profile to act as a heat sink, the LED strips will overheat, causing the adhesive to fail and the LEDs to dim prematurely. We snap the aluminum channel into the pre-routed groove for a seamless, flush look. Finally, we select the right diffuser. Opal diffusers are our standard choice because they hide the individual LED chips and create a soft, uniform glow. Frosted diffusers offer slightly more light output but might still show some “spotting” on highly reflective surfaces like polished marble or glass backsplashes.
Avoiding Common Mistakes: Heat Dissipation and Light Spotting
Even with a perfectly routed channel, technical oversights can ruin the final look of your renovation. One of the most common issues is the “dotting” effect, where individual LED chips are reflected as distinct, ugly spots on your countertop. This usually happens when the LED strip has a low chip density or when the aluminum profile is too shallow. To achieve a continuous bar of light, you must match high-density strips with a deep enough profile and an opal diffuser. If you’re learning How To Install LED Lights In Your Custom Made Cabinets And Carpentry?, you’ll also need to account for voltage drop. If you chain too many strips together on a single circuit, the light at the far end will appear dimmer and warmer than the start. This is often caused by using wire gauges that are too thin to handle the current over long distances.
Heat management is another critical factor that many DIY guides ignore. While LEDs are more efficient than old bulbs, they still generate significant heat at the base of the strip. Because wood and plywood are natural insulators, they trap this heat within the carpentry carcass. If this isn’t managed with a proper aluminum heat sink, the heat will eventually cause the cabinet laminate to bubble, peel, or discolor. Heat dissipation is the primary factor in determining the actual lifespan of your LED system. Using the correct wire gauge, typically 18 to 22 AWG for most residential cabinet runs, also prevents resistance build-up and reduces the risk of electrical fires in enclosed spaces.
Managing Reflections on Glossy Surfaces
Singaporean kitchens often feature highly reflective surfaces like polished quartz, marble, or glass backsplashes. If you place your LED strip in the center of the cabinet pointing straight down, you’ll likely see a perfect reflection of every LED chip on your counter. We solve this by adjusting the angle of incidence. A common professional trick is to use a 45-degree corner profile mounted at the front lip of the upper cabinet, pointing back toward the backsplash. This creates a soft, indirect wash of light that illuminates the workspace without creating harsh glares. Always test your light placement with a temporary power source before applying the final adhesive or snapping the diffusers into place.
Longevity in Singaporean Humidity
The high humidity in Singapore is the enemy of cheap adhesives. Standard double-sided tape that comes on the back of budget LED strips will almost certainly fail within a year, especially in “wet” zones like the area above a dish rack or near a stove. We ensure longevity by mechanically securing the aluminum profiles into the routed grooves with small countersunk screws. This provides a permanent housing that won’t sag or drop. For wiring near sinks, we use heat-shrink tubing on all connections to prevent moisture from causing short circuits. If you want a lighting setup that lasts as long as your furniture, contact our carpentry team for a direct-contractor quote that includes professional electrical integration without the middleman markup.
Why Professional Carpentry Installation Beats DIY LED Kits
While off-the-shelf LED kits are widely available, they often fail to meet the structural and aesthetic standards required for high-quality Singaporean homes. The biggest difference lies in the seamless coordination between the carpentry fabrication and the electrical wiring team. When we handle your renovation, the carpenter doesn’t just build a box; they prepare a precision-engineered carcass that accounts for every millimeter of the lighting hardware. This level of technical synergy ensures that the final result is a permanent fixture of the home rather than a fragile add-on. If you’re researching How To Install LED Lights In Your Custom Made Cabinets And Carpentry?, you’ll find that professional integration eliminates the risk of messy, exposed cables that typically plague DIY projects.
Safety and regulatory compliance are non-negotiable for HDB and condo owners. Electrical work in Singapore is strictly regulated. Any installation involving new lighting points or concealed wiring must be certified by a Licensed Electrical Worker (LEW) to ensure it meets Energy Market Authority (EMA) standards. DIY electrical work can void your home insurance or lead to safety hazards if the load calculations for your drivers are incorrect. By choosing professional installation, you receive a warranty on both the carpentry and the electrical components. This provides long-term peace of mind that a stick-on kit simply cannot offer. We tailor the light intensity and color temperature to your specific floor plan, ensuring your task lighting is functional and your accent lighting is perfectly balanced.
The Direct Contractor Advantage
One of the primary benefits of working with us is the removal of the interior design (ID) markup. Most homeowners pay a significant premium for lighting integration because of the multiple intermediaries involved. We operate our own fabrication workshop in Paya Ubi, allowing for direct communication between you and the craftsmen building your cabinets. This streamlined business model ensures that the technical secrets of How To Install LED Lights In Your Custom Made Cabinets And Carpentry? are applied at the source. You get premium, integrated lighting solutions at a transparent, direct-contractor price, with project management that covers everything from the initial 3D drawing to the final site installation.
Next Steps for Your Renovation
To ensure your lighting is integrated correctly, you should specify your LED requirements during the initial quoting phase. This allows us to factor in the routing and wire pathing before the wood is cut. We’ll conduct a site assessment to evaluate your current electrical load and determine the best locations for hidden drivers. This proactive planning prevents costly changes later in the renovation process. If you’re ready to upgrade your kitchen or wardrobe with professional, durable lighting, you can Get a direct carpentry quote with integrated lighting today. We’ll provide a clear, honest breakdown of the costs involved, ensuring your project is delivered with technical competence and financial transparency.
Secure Your High-End Cabinetry Finish
Professional lighting isn’t a luxury; it’s a technical requirement for functional modern homes. You now understand that achieving a seamless look involves routing channels during the fabrication stage and selecting the right 24V drivers to prevent voltage drop. By managing heat through aluminum profiles and ensuring your wiring is HDB-compliant, you protect your investment from laminate peeling and electrical failure. Mastering How To Install LED Lights In Your Custom Made Cabinets And Carpentry? is really about planning for integration before the first piece of wood is cut in the workshop.
We specialize in direct-to-consumer carpentry and in-house electrical services from our Paya Ubi facility. This allows us to offer expert carpentry fabrication and safe, compliant wiring without the typical markups found elsewhere. If you want a durable, integrated lighting solution for your HDB or condo, Request a Transparent Carpentry & Electrical Quote today. Our team is ready to help you achieve a high-quality finish at direct factory prices. We look forward to bringing your renovation vision to life with technical skill and honest, straightforward communication.
Frequently Asked Questions
Do I need a separate power point for my cabinet LED lights?
Yes, you typically need a dedicated power source, such as a 13A socket, installed specifically for the LED driver. We usually position this point inside the top cabinet or within a false ceiling to keep it hidden from view. It’s best to avoid tapping off existing appliance sockets to ensure the circuit isn’t overloaded and the wiring remains completely concealed within the carpentry.
Can I install LED strips in my existing kitchen cabinets?
You can install them, but achieving a truly integrated look is difficult once the cabinets are already mounted. Since the carcasses weren’t pre-routed, you’ll likely have to use surface-mounted profiles, and hiding the wires becomes a significant challenge. For a flush finish where the light is built into the wood, the installation must happen during the carpentry fabrication phase.
What is the best color temperature for kitchen cabinet lighting?
Cool White (4000K) is the industry standard for Singaporean kitchens because it provides excellent clarity for food preparation without being overly blue or clinical. If you’re lighting a display cabinet or a wardrobe, Warm White (3000K) is a better choice as it creates a softer, more inviting atmosphere that complements wood grain finishes.
How do I hide the bulky LED transformer/driver?
We hide drivers in accessible but discreet locations like the top shelf of a wall cabinet or behind a magnetized false back panel. It’s vital that the driver isn’t sealed away permanently; it needs air circulation to prevent overheating and must be reachable if it needs replacement. Proper planning during the design phase ensures these components don’t take up valuable storage space.
Is it safe to leave cabinet LED lights on overnight?
It’s generally safe as long as you’re using high-quality drivers with built-in overheat protection and NEA-certified LED strips. Modern LEDs run much cooler than traditional bulbs, but leaving them on 24/7 will eventually degrade the chips and shorten their lifespan. We recommend using a dedicated switch or a smart sensor to manage energy consumption effectively.
Why are my LED lights flickering or spotting?
Flickering is almost always a sign of a failing driver or a loose connection in the low-voltage wiring. Spotting occurs when you use low-density LED strips in a profile that’s too shallow, allowing individual light “dots” to show through the diffuser. To fix this, we use high-density COB strips and deeper aluminum channels that blend the light into a single, solid bar.
How much does it cost to add integrated lighting to carpentry?
Do I need an HDB permit to install cabinet lighting?
You don’t need a specific HDB renovation permit just for the lights themselves. However, any new electrical wiring or the addition of new power points must be carried out by a Licensed Electrical Worker (LEW) to comply with safety regulations. Learning How To Install LED Lights In Your Custom Made Cabinets And Carpentry? involves ensuring all concealed wiring meets these local standards to prevent issues during future flat inspections.