

What if the biggest risk in a DIY renovation isn’t the work itself, but the handoff between trades? A tiler may need plumbing completed and tested first, while a carpenter needs final measurements before fabrication. Managing subcontractors for diy renovation means keeping dependencies, expectations and decisions visible, not simply booking trades one after another.
Taking charge yourself can give you more control over the schedule and spending, but you also coordinate each trade’s scope, access and handover. If subcontractors have different expectations about the work or finish, small gaps can lead to delays, disputes or rework. A clear written brief and record of decisions help everyone work toward the same result.
This guide explains how to define each trade’s scope, plan a practical work sequence, and track progress, changes, defects and payment milestones. It also covers handovers between stages, so responsibilities don’t get lost along the way. For homeowners who want structure from the outset, 3D drawings can help communicate the intended work, while access to curated direct subcontractors can support homeowner-led coordination.
Key Takeaways
- Break the renovation into trade-specific scopes so each subcontractor has a shared reference for the work and finish expected.
- Build the schedule around dependencies, then adjust the order to suit the project scope, site conditions and current requirements.
- Keep decisions and changes in one written record to reduce confusion about instructions, responsibilities and approvals.
- Use a regular review cycle to check work in progress, identify upcoming dependencies and record specific defects before acceptance.
- Successful managing subcontractors for diy renovation depends on your capacity to make decisions, keep records and coordinate access, or use structured DIY support.
Managing subcontractors for a DIY renovation starts with a clear scope
In a DIY renovation, you coordinate separate trade scopes, decisions and site access rather than handing the entire job to one main contractor. That puts you in a coordination role similar to the role of a general contractor. You gain direct control, but also take on the scheduling and communication needed to keep each stage aligned.
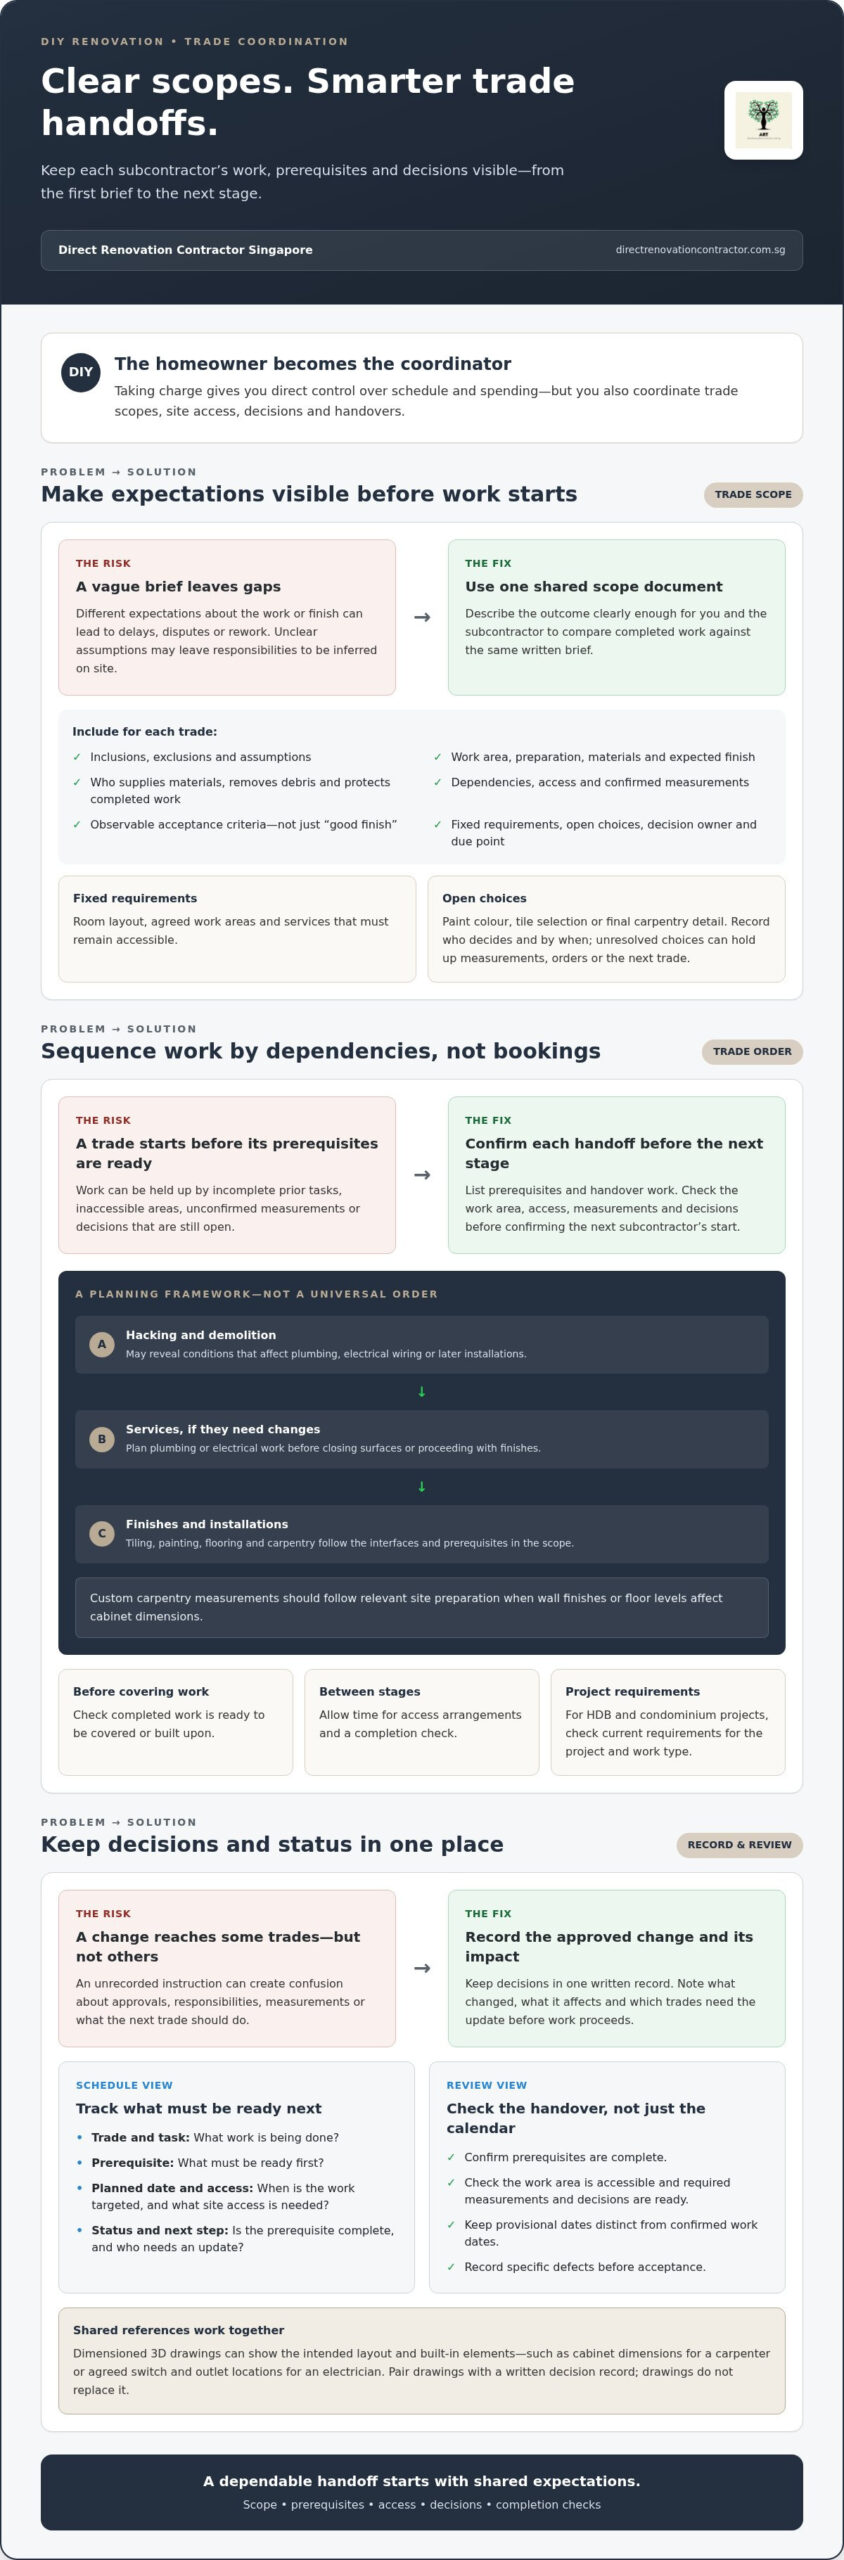
Separate fixed requirements from open choices at the start. Fixed requirements might include the room layout, agreed work areas and services that must remain accessible. Open choices could include a paint colour, tile selection or final carpentry detail. Record who will make each decision and by when. An unresolved choice can hold up measurements, material orders or the next trade’s start.
Put the project scope in one shared document. For each trade, note:
- Inclusions, exclusions and assumptions
- Work area, preparation, materials and expected finished outcome
- Who supplies materials, removes debris and protects completed work
- Dependencies, such as access, confirmed measurements or prior work being completed
- Acceptance criteria, described in observable terms rather than “good finish”
What should a subcontractor scope include?
How do drawings help trades understand the same plan?
Use dimensioned 3D drawings as a shared reference for the layout and built-in elements, then identify the views relevant to each trade. A carpenter may need cabinet dimensions and clearances, while an electrician needs the agreed locations of switches or outlets. Drawings support coordination, but they don’t replace a written decision record. If the plan changes, document the approved change, what it affects and which trades need the update before work proceeds.
For managing subcontractors for diy renovation, the scope document and drawings work together: one sets out responsibilities and expectations; the other helps everyone picture the intended result.
Sequence renovation subcontractors around trade dependencies
A workable schedule follows the tasks that must happen first, not simply the order in which trades are booked. The right sequence depends on the renovation scope, site conditions and current project requirements. Use a proposed trade order as a planning framework, then check it against approved plans and site constraints before confirming dates.
Which renovation trades commonly depend on earlier work?
Start by identifying work that changes or exposes the space. Hacking and demolition can reveal conditions that affect plumbing, electrical wiring or later installations. If services need changes, plan that work before closing surfaces or proceeding with finishes. Tiling, painting, flooring and carpentry follow according to the interfaces in your scope.
Custom carpentry measurements should follow relevant site preparation. If a wall finish or floor level affects cabinet dimensions, measuring too early can lead to a poor fit or adjustments later. Before the next subcontractor starts, confirm that its prerequisites are complete, the work area is accessible and the required measurements and decisions are ready.
- List each trade’s prerequisites and the work it hands over.
- Check that completed work is ready to be covered or built upon.
- Allow time for access arrangements and a completion check before the next stage.
For HDB and condominium projects, coordination requirements can vary by project and work type. Check the current requirements that apply to your project before setting the sequence or confirming site dates. Don’t assume the same order or access arrangements will suit every home.
How can homeowners build a realistic trade schedule?
Work backwards from a key milestone, such as a planned move-in, but treat it as a target rather than a promised completion date. For each trade, record prerequisites, target dates, access needs and completion status. Keep provisional dates distinct from confirmed work dates. Leave time for access coordination and checks between stages instead of scheduling every trade back-to-back.
Use a simple dependency table to spot where a change could affect later work:
- Trade and task: What work is being done?
- Prerequisite: What must be ready first?
- Planned date and access: When is the work targeted, and what site access is needed?
- Status and next step: Is the prerequisite complete, and who needs an update?
If an approved plan change affects a measurement or installation, update the schedule and tell every affected trade before work proceeds. A shared timeline and clear handoffs make managing subcontractors for diy renovation more predictable, even when dates need to move. Homeowners who want a structured starting point can explore DIY renovation coordination support.
Prevent DIY renovation delays with clear communication and change control
DIY coordination can become chaotic when instructions are scattered across chat messages, calls and marked-up drawings. Set up one source of truth for decisions, open questions, site updates and changes. Tell each subcontractor where to find the latest approved instruction, and update the record promptly when a decision is made.
Verbal discussions can resolve details on site, but people may remember them differently. A request to shift a light point, for example, could affect electrical work, ceiling details and later painting. Before work proceeds on a changed instruction, write down what was agreed, who approved it and which trades need the update. Record any effect on materials already ordered and dates for later work rather than assuming the change is minor.
What should a renovation change record contain?
Make each change clear and traceable. Record what was requested, why, which area is affected and who approved the decision. Note confirmed effects on scope, materials, schedule or follow-on trade work. Then send the same updated instruction to every affected subcontractor. This helps prevent one trade from following a new decision while another continues with the original plan.
- Change: Describe what is different and where.
- Decision: Record who approved it and when.
- Impact: Note confirmed material, scope or schedule changes.
- Distribution: Identify which trades received the revised instruction.
How can homeowners keep communication accountable?
Use a central log with a dated entry for each decision, open question, site update and assigned action. After an important site discussion, send a short written summary of what was agreed, who will follow up and by when. If an answer is pending, mark it as open rather than treating it as approval. This helps prevent work from proceeding on an assumption.
Describe defects with specific observations, not broad comments such as “the finish looks wrong.” Record the date, location, relevant scope item or drawing reference, and what needs attention. Dated photographs can help show the condition clearly. Where relevant, photograph concealed work and completed stages before they’re covered or altered, so the project record reflects the work at that point.
A consistent written trail makes managing subcontractors for diy renovation easier to track. It gives you a practical reference when plans change, responsibilities are unclear or work needs to be reviewed against the agreed scope.
Use a simple weekly system to manage renovation trades on site
A short, repeatable check-in keeps the project moving without relying on memory. Once a week, compare completed work with the scope, confirm what must happen next and update your project record. The aim isn’t to approve every task on the spot. It’s to spot gaps early, assign follow-up and give each trade consistent information.
What should a weekly subcontractor check-in cover?
Review what’s complete, what remains open and whether the next trade’s prerequisites are ready. Confirm access, the work area, and whether required materials or decisions are in place. For HDB and condominium projects, include relevant site access, delivery arrangements and shared-area considerations in your plan, and follow the current requirements that apply to your project.
Keep an action list with a clear owner and target follow-up date. For example, record that a measurement is pending, who will provide it and when it needs to be resolved for the next installation. Share decisions that affect multiple trades with each affected person, then update the central project record.
- Progress: What work is complete, and what remains outstanding?
- Dependencies: Is the next work area ready, and are prerequisites complete?
- Logistics: Are access, deliveries and working areas coordinated?
- Actions: Who owns each open item, and when is follow-up targeted?
How should homeowners inspect completed trade work?
Separate a progress check from final acceptance. During the work, note visible concerns that need clarification or correction. Before closing an item, compare the completed work with the relevant drawing, agreed specification and applicable project requirements. Avoid vague approvals such as “looks fine.” Describe what you observed and where, so the responsible trade can understand the issue.
Instead of writing “tile finish needs fixing,” identify the room, wall or floor area, the specific issue you can see and the date you recorded it. Add a dated photograph where useful. Track the correction, who is responsible and the target follow-up date. Recheck the area after the work is addressed, then mark the item closed in your record.
This weekly routine turns managing subcontractors for diy renovation into a visible process: progress, dependencies and outstanding work are easier to follow. If you want a structured starting point for coordinating trades, explore DIY renovation support.
Choose a DIY renovation support model that fits your coordination capacity
The right setup depends on how much time and responsibility you can take on. Compare options by who makes decisions, coordinates trades and manages day-to-day site arrangements, not just by how much control each one appears to offer.
Is fully DIY or structured support the better fit?
With full homeowner coordination, you manage trade scopes, schedule work, arrange access, answer questions and keep project records. This gives you direct involvement, but also means you must be available to make decisions and follow up when one trade’s work affects another’s.
Consider your project’s complexity and your available time. A renovation involving several trades and linked work stages calls for more coordination than a narrower scope. DIY management is a better fit if you can maintain written records, respond to decisions and coordinate site access. It doesn’t automatically mean lower costs or guarantee control over the schedule. The trade-off is straightforward: more direct involvement also means more responsibility.
How can Direct Renovation Contractor Singapore support a DIY project?
Direct Renovation Contractor Singapore’s DIY support package includes 3D architectural drawings and a curated list of direct subcontractors. Drawings give trades a shared visual reference for the intended layout and built-in elements, while the list supports homeowner-led coordination of separate scopes. Use the drawings alongside written instructions, and record approved changes separately so everyone works from the same current decisions.
Before choosing a support model, decide what you want to manage yourself: all trade communication, selected project decisions, or mainly the overall outcome. Match that level of involvement to the support structure and responsibilities you need. Explore practical DIY renovation support for drawings and curated direct subcontractor access as part of a homeowner-led approach.
Set your renovation up for clearer coordination
Managing subcontractors for diy renovation works best when every trade has a clear scope, the schedule follows work dependencies and decisions stay in one written record. A regular site review helps you track progress, confirm what needs to happen next and follow outstanding items through to completion.
The right support model depends on how much time you can give to decisions, records and site access. Direct Renovation Contractor’s DIY renovation support includes 3D architectural drawings and a curated list of direct subcontractors. The drawings help communicate the intended work, while the direct contracting model covers multiple residential renovation trades.
For a practical starting point, explore DIY renovation support with drawings and direct subcontractor access. Clear responsibilities and a workable process help you coordinate the renovation one stage at a time.
Frequently Asked Questions
How do I manage subcontractors for a DIY renovation?
Start with a written scope for each trade, then coordinate work around dependencies, access and decisions that need to be made. Keep one current record of dates, responsibilities, changes and open items. Review progress regularly and check completed work against the agreed scope before treating a stage as finished. Managing subcontractors for DIY renovation takes active communication, so allow time to answer questions and update affected trades when plans change.
What order should renovation subcontractors work in?
Use the project’s dependencies to set the order rather than following a fixed sequence for every home. Demolition may come before plumbing or electrical changes; affected surfaces and finishes generally follow those works, with installations scheduled when their prerequisites are ready. Custom carpentry measurements should account for relevant site preparation. Check the approved plans, site conditions and current project requirements, then confirm each handoff before the next trade begins.
How do I prevent subcontractors from delaying a renovation?
Reduce avoidable delays by confirming prerequisites, access, materials and decisions before each trade’s planned start. Keep target dates separate from confirmed work dates, and update the schedule when a dependency changes. Maintain a shared action log showing the outstanding item, responsible person and target follow-up date. A regular review helps identify issues early, such as a measurement or finish choice that could hold up a later installation.
What should I include in a subcontractor work scope?
Describe the work area, preparation required, materials and expected finished outcome. State who supplies materials, removes debris and protects completed work. List exclusions, assumptions and dependencies, such as access requirements, confirmed measurements or preceding work that must be complete. Include practical acceptance criteria so you can assess the result against specific details rather than a vague expectation like “good finish.” Refer to relevant drawings or specifications where they clarify the scope.
What happens if a subcontractor’s work affects the next trade?
Record the issue and identify which later work depends on it before continuing the schedule. For example, if a service location or finished surface differs from the agreed plan, a later installation may need revised measurements or instructions. Document the affected area, decision required, responsible person and any confirmed schedule impact. Once the issue is resolved, update the relevant trade and check that the next stage’s prerequisites are ready.
Can I manage HDB renovation subcontractors myself?
Yes, homeowners can coordinate separate trades themselves if they have time to make decisions, maintain records and organise site access. The work still needs to follow requirements that apply to the specific HDB project and renovation scope. Check current requirements before scheduling work, and keep clear records of approvals, instructions and handovers. If the project involves several interdependent trades, plan for more communication and follow-up than a single-trade job needs.
How should I handle changes during a DIY renovation?
Write down each requested change before affected work proceeds. Record what is changing, why, the area involved and who approved the decision. Note confirmed effects on scope, materials, schedule and subsequent trades, then send the same updated instruction to everyone affected. Keep the revised record with the project documents. Verbal discussions can clarify a detail, but a written change record reduces the risk of trades acting on different interpretations.