
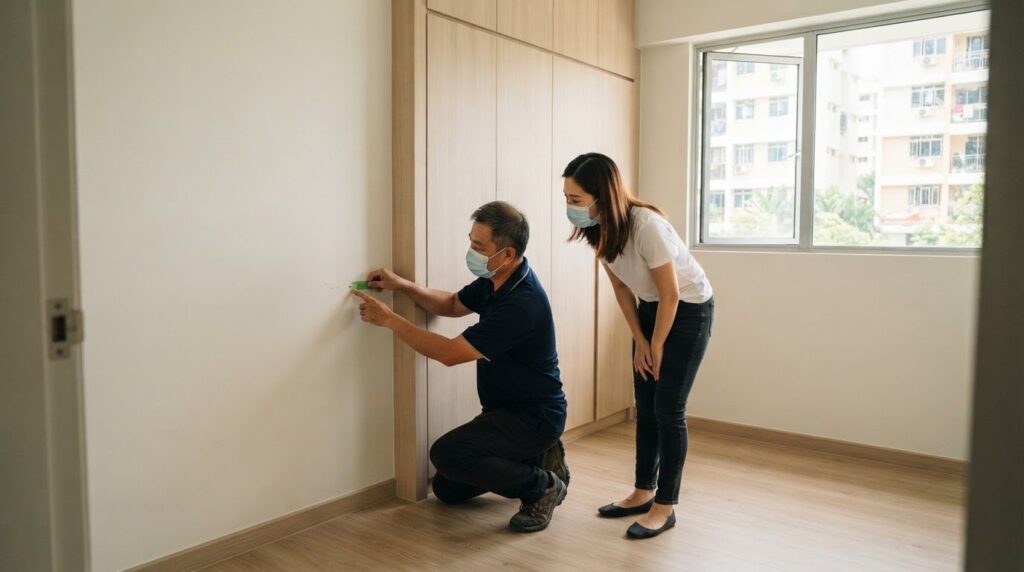
In Singapore, on-site renovation work typically takes 10-12 weeks. During renovation and after handover, the key is to finish any touch-ups before the main clean, then clean and air the home before furniture arrives. A practical gap between handover and moving day is three to four weeks.
It’s tempting to treat handover as the finish line, but moving in too soon can leave dust on new surfaces, residue on tiles and furniture in the way of final checks. A clear sequence helps you spot defects while rooms are empty and gives fresh paint, adhesives and sealants time to air out.
This guide explains what to inspect and document before moving furniture in, when tile treatment and post-renovation cleaning fit, and why ventilation matters as you settle into your Singapore home. You’ll also see how carpentry, flooring, painting, electrical installation and plumbing affect an orderly handover, so you can plan the transition with fewer avoidable surprises.
Key Takeaways
- Keep tile treatment, final cleaning and furniture delivery in the right order to avoid trapping residue or creating extra cleanup.
- Record defects while rooms are clear, so concerns are visible and can be addressed before belongings arrive.
- Use a careful dust-removal approach and choose surface-safe methods for construction residue.
- Air the home after cleaning and continue paying attention to lingering odours as you settle in.
The correct sequence for tile treatment, cleaning and furniture delivery
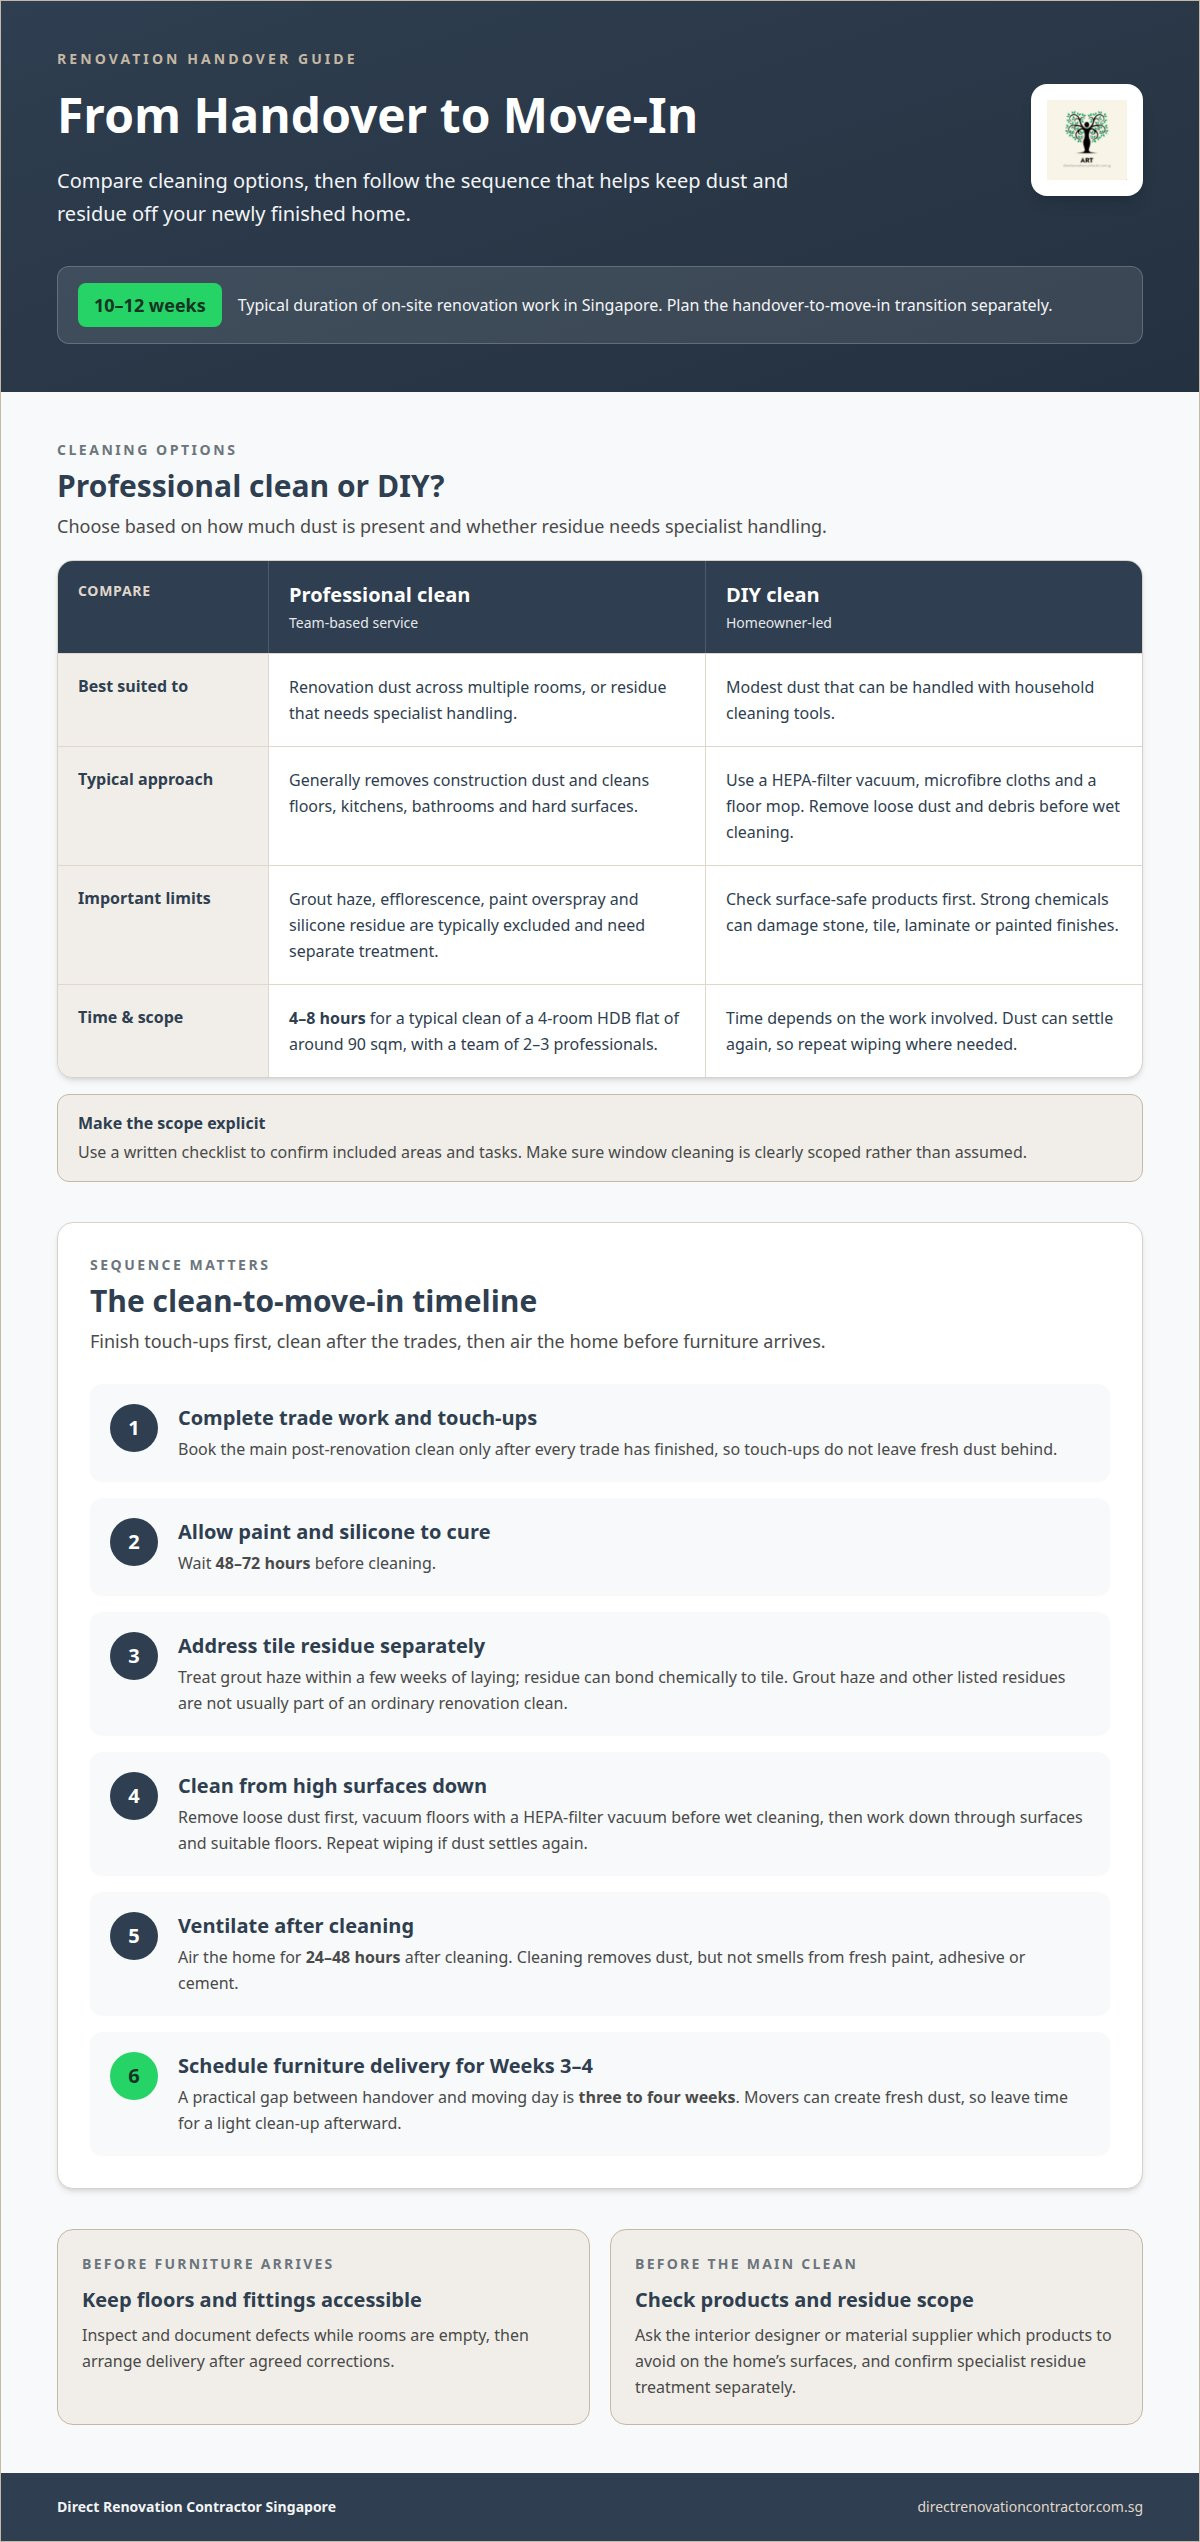
During and after renovation, keep tile treatment, cleaning and furniture delivery in the right order. Treat grout haze within a few weeks of laying, because residue can bond chemically to tile. Book the main post-renovation clean after every trade finishes, so touch-ups don’t leave fresh dust behind. Allow paint and silicone to cure for 48 to 72 hours before cleaning.
Professional cleaning generally removes construction dust and cleans floors, kitchens, bathrooms and hard surfaces. It typically excludes grout haze, efflorescence, paint overspray and silicone residue, which need separate treatment. A written checklist helps you and the contractor confirm which areas and tasks are included. Make sure window cleaning is clearly scoped rather than assumed.
A typical clean for a 4-room HDB flat of around 90 sqm takes four to eight hours for a team of two to three professionals. Professional cleaning is useful when renovation dust covers multiple rooms or residue needs specialist handling. For modest dust, homeowners can clean with a HEPA-filter vacuum, microfibre cloths and a floor mop. Removing loose dust and debris also reduces what gets tracked across clean floors.
In Singapore, noisy renovation work is permitted only from 9am-6pm, Monday to Saturday, and is banned on Sundays and public holidays. During renovation, homeowners should communicate concerns, follow progress, secure valuables and keep clear of tools, debris, wet floors and exposed work areas. Leave room for trades to complete their tasks safely.
Track progress against the agreed scope, record changes in writing and keep payment records. Release payments according to the agreed milestones and completed work, not informal verbal requests. These records help resolve questions about unfinished items before handover.
Before furniture arrives, finish cleaning, air the home and allow time for residue to be addressed. Ventilate for 24-48 hours after cleaning, then schedule delivery for Weeks 3-4 when the space is clean and aired. Movers can create fresh dust, so keep a light clean-up for afterward. This sequence makes the transition after renovation easier to manage.
Documenting defects before moving furniture in
Make the final inspection while rooms are empty. The suggested Singapore timeline places handover and the contractor defect check at Week 0; final inspection and rectification typically take 1-2 weeks. Moving furniture in later keeps floors, walls and built-in fittings accessible, making a thorough defect check easier.
Use a room-by-room checklist and record each issue clearly. Include its location, what is wrong and a dated photo showing both the defect and its context. For example, photograph a chipped tile beside its grout lines or a wardrobe door that will not close. Note the room and fitting so the contractor can locate the item without guesswork.
- Inspect tile edges, grout, paintwork and skirting for visible damage or uneven finishing.
- Open cabinet doors and drawers; test handles and check alignment.
- Run taps and flush toilets to identify leaks or drainage problems.
- Test installed lights, switches and sockets, then note any faults.
Send the completed list and photos to the contractor in writing before furniture delivery. Keep replies and rectification dates with your handover records. This creates a clear timeline and helps distinguish unfinished work from damage caused during the move. Schedule delivery after agreed corrections, while access remains clear.
Renovation warranties and defect liability periods are governed by the written agreement. An agreement may include a one-year warranty, but coverage and the reporting process depend on its terms. If a dispute arises, retain the agreement, payment records, messages and defect photos. Raise the issue in writing and record the response and proposed resolution.
Include installed aircon units in the inspection if they form part of the completed work. Record whether they operate and whether the filter is fitted, without removing components or disturbing unfinished work. A dated checklist helps keep handover discussions specific. For renovation planning that supports an orderly final inspection, review Singapore renovation work.
Post-renovation dust, debris and residue removal
Renovation dust settles on interior surfaces, including ceiling edges, window tracks and kitchen cabinets. Start by removing dust from high surfaces, then work downwards with a dry microfibre cloth or mop. Vacuum floors with a HEPA-filter vacuum before wet cleaning, so loose particles do not spread into damp residue. Dust may settle again, so repeat the wipe where needed.
Clean rooms in a consistent sequence. Clear loose debris from shelves and ledges, then wipe cupboards, doors and other hard surfaces. Finish by wet-cleaning suitable floors and kitchen surfaces. Pay particular attention to bathroom fixtures and tiled surfaces, and remember that window tracks can hold fine dust. Use a proper floor mop, and do not assume one pass removes every layer.
Choose cleaning products according to the material. Before applying one, ask the interior designer or material supplier which products to avoid on stone, tile, laminate or painted surfaces. A strong chemical can damage a finish while you try to remove residue. Grout haze, paint overspray and silicone residue need specific treatment and are typically excluded from ordinary renovation cleaning.
Air-conditioning units can collect renovation dust inside the system. Once the dust has settled, arrange for a qualified technician to flush and service the units before the main clean. A HEPA-filter air purifier may help remove remaining airborne particles, especially for household members with allergies or asthma. Cleaning removes dust, but not smells from fresh paint, adhesive or cement. Ventilation, time and activated charcoal may help.
Install curtains and soft furnishings after airing out the home. Fabric can trap dust and odours if fitted too early. Once furniture and curtains are in place, renovation dust may reappear on surfaces. A follow-up clean about one month after moving in can address lingering particles, focusing on shelves, the kitchen and other areas disturbed during unpacking.
Settling in and continued ventilation
During and after renovation, plan how each room will be used as your home changes from worksite to living space. Airflow is easier to maintain when furniture placement and daily routines support it.
Ventilating Renovated Rooms
Ventilating renovated rooms means letting fresh air move through areas with new finishes. During and after renovation, avoid sealing off rooms with closed doors and tightly packed belongings while indoor air clears. Keep pathways between rooms unobstructed, and use the home’s available window openings to support airflow.
Pay attention to enclosed spaces, such as bedrooms with built-in wardrobes or rooms where doors stay shut. Air these areas along with the rest of the home, rather than focusing only on the living room. If a strong new-house smell persists, you may consider professional formaldehyde removal.
Settling Into the Home
Settling in means arranging belongings while keeping rooms practical to use and maintain. Place furniture so it does not block window access or create tightly enclosed corners. Where the layout allows, leave accessible gaps behind large items to make cleaning easier and keep air moving around newly finished surfaces.
As appliances arrive, keep their ventilation openings clear and avoid stacking boxes around them. Check countertops, shelves and cabinet interiors after unpacking, as packaging can leave dust or debris behind. Households moving an infant or young child into a newly renovated home should take a more conservative approach to settling in.
Use the handover plan to coordinate the first days of occupancy with remaining work and deliveries. Plan your renovation project with the move-in transition in mind.
Direct Renovation Contractor Singapore
Direct Renovation Contractor Singapore plans and carries out renovation work for HDB BTO flats, resale HDB flats, condominiums and landed homes. If you’re preparing for a project, its renovation packages cover the work needed to move from construction towards handover, cleaning and move-in planning.
For homeowners managing their own renovation, the company also provides 3D drawings and a curated list of direct contractors and material suppliers. This approach can help you coordinate the work sequence and understand how different trades affect final inspection, cleaning and furniture delivery.
Share your renovation plans or handover questions with Direct Renovation Contractor Singapore to discuss the next step.
Plan the next stage with confidence
The move from construction to daily life is easier when the renovation plan accounts for what happens after the final workday. Decisions made During & After Renovation can affect how smoothly you settle in, so treat handover and move-in planning as part of the project, not an afterthought.
Direct Renovation Contractor Singapore offers HDB BTO Renovation Packages, HDB Resale Renovation Packages and Condo Renovation Packages. If you’re planning a home renovation or want to discuss how the work can be organised through to handover, start with a clear conversation about your property and priorities.
Contact Direct Renovation Contractor Singapore to discuss your renovation plans. A well-planned project gives you a clearer path from worksite to home.
Frequently Asked Questions
How Long Does Each Renovation Stage Take?
Planning and approvals can take several weeks before on-site work begins. In Singapore, shortlisting renovators typically takes 1-3 weeks, quotation comparisons 2-4 weeks, and design and space planning 2-4 weeks. Material selection takes 1-2 weeks, while permit applications and approvals commonly take 1-3 weeks. On site, hacking is scheduled for Weeks 1-2, followed by electrical and plumbing work during Weeks 3-5.
So How Long Does a Full Home Renovation Take?
A full renovation process, from shortlisting renovators through planning, permits, construction and moving in, usually takes 9 to 12 months in Singapore. Actual on-site work is only one part of that timeline. Material procurement, design changes caused by site constraints and approval steps can affect the schedule. Build time into your move arrangements rather than treating the final construction date as move-in day.
What are the signs you need professional help?
Bring in the relevant trade when cleaning exposes grout haze, efflorescence, paint overspray or silicone residue, as these usually need specific treatment. A scratch on tile or flooring is damage, not dirt, so repeated scrubbing will not remove it. Stop using any fitting that leaks, sparks or fails during testing, and arrange an assessment by the relevant trade. Get material-specific advice before applying unfamiliar chemicals.
What should I do if the clean reveals damage I did not notice before?
Photograph the damage and report it to the contractor in writing before moving furniture in. Take one close-up and another image showing its position, such as a chipped tile beside the doorway. Include the room, date and a short description, then keep the message and response with your handover records. Do not cover or try to repair the area before the contractor has reviewed it.
What are the renovation stages and typical timeline in Singapore?
A typical sequence starts with planning, design and approvals, followed by hacking, electrical and plumbing work, waterproofing, flooring and tiling. Carpentry, painting and finishing come later, with countertops, final inspection and handover near the end. The suggested schedule places hacking in Weeks 1-2, flooring and tiling in Weeks 5-7, and final inspection around Weeks 11-12. Trades can overlap depending on the project.
What renovation permits and approvals are required from HDB, BCA, or condo management?
Requirements depend on the property and proposed work. HDB renovation permit approval typically takes 2-4 weeks. For private properties, the Building and Construction Authority advises owners to engage a Qualified Person to advise on clearances for intended building works. Condo management sets the estate’s submission, access and work procedures; establish the required approvals and conditions before scheduling contractors.